Script to make WordPress site migrations easier

I’ve cleaned up and release the script that I use to migrate my WordPress sites between my local development server and a live web server. It’s hosted up on GitHub if you care to grab a copy or fork it to make your own improvements.

Updates
  • 01/26/2012 – Script now searches thru all custom fields (postmeta table) and replaces any hard-coded URI’s

There have been several attempts by others (many of which are more elegant) in the past to address this problem, but it always seemed like overkill to me. Many of them required a plugin or hacks to the wp-config.php file.

This is my attempt to simplify my own process a bit. If you use the script, I’d love some feedback on how it worked for you.

WordPress Migration

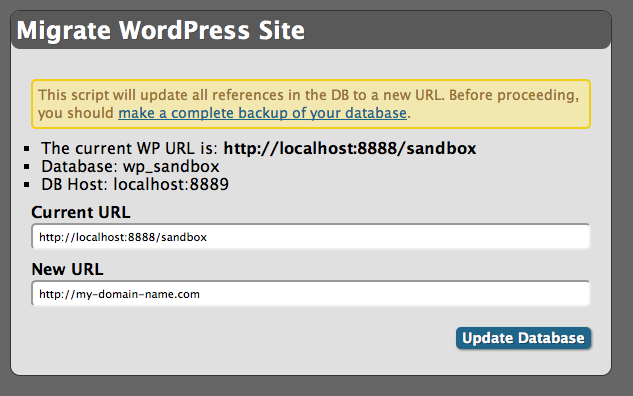
The purpose of this script is to quickly and easily allow the user to update all database references for a WordPress website. Instead of doing a manual, find-and-replace of a MySQL text file, this script connects to your WordPress database and does all of the heavy lifting for you.

WARNING! This script modifies the database as configured in your wp-config.php file. You should make a full backup of your database before using this script.

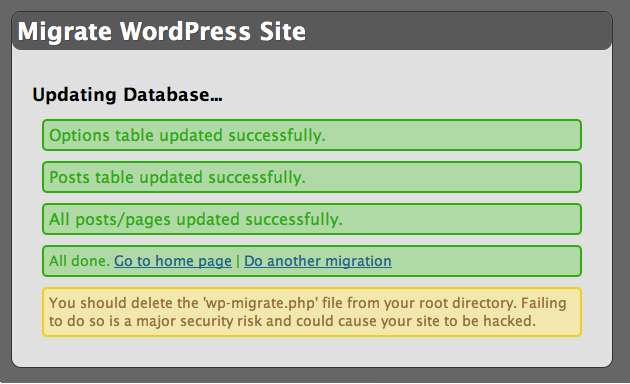
SECURITY NOTICE – This script should not be left on a live web server as it offers direct access to your database. When you’re done with your migration, delete the script.

Script Installation

  1. Ensure your wp-config.php file has the correct database connection settings.
  2. Upload the wp-migrate.php file into the root directory of your WordPress installation.
  3. Point your web browser to the script (like http://mywebsitedomain.com/wp-migrate.php)
  4. If your wp-config.php file is setup correctly, the script will determine the current “old” website URL.
  5. Set the “New URL” field to the absolute URL you’d like the database updated to.

Additional Notes

  • Depending on the plugins you use, you may get PHP error notices about files not being included. You can generally ignore these.

Using Adminer with MAMP on Mac OS X

So, thanks to a tip from a friend, I discovered a script called Adminer. It’s built to replace PHPmyAdmin and focuses on speed, security and user interface. While I’m not entirely sure that it will become my day to day database management tool, from what I’ve seen so far, I really dig it.

Setting up Adminer is a no-brainer. Just put it in a directory that’s accessible to run PHP scripts and hit the URL in your browser. You’ll get a login screen and be off and running. Seriously, it’s that easy. No configuration whatsoever. The English and MySQL-only version that I’m running is just 158kb too! Pretty awesome, right?

Most of my database management I do locally when I’m developing a new website. On my Mac, I run the program MAMP (Mac, Apache, MySQL, PHP). There’s Windows and Linux versions of the software too. When MAMP launches it loads the start page automatically in your default browser. I wanted to create a link from MAMP to Adminer just like you get for PHPmyAdmin on the start page.

Here’s how I did it… For the purposes of this tutorial, we’ll assume you’re using the English version.

First, decide on where you’ll install Adminer. Since all my PHP files are served from the Sites directory, I decided on ‘Sites/utilities/adminer’. I renamed the default adminer.php file to index.php so that whenever the directory is hit within a browser, it automatically loads. So now the absolute URL to Adminer would be:

http://localhost:8888/utilities/adminer/index.php

Now, open the MAMP folder. Mine is located at ‘Username > Applications > MAMP’. Now open the ‘bin > mamp > English’ folder. Duplicate the ‘navigation.inc.php’ file so that you have a backup should you need it.

Open the file in your favorite code editor. Around line 14 you’ll see the following code.

<li><a href="frame.php?src=<?php print rawurlencode("/phpMyAdmin/?lang=en-iso-8859-1"); ?>&amp;language=<?php print $language; ?>"><img alt="" src="images/bullet<?php print ($hl=="phpmyadmin") ? "_active" : ""; ?>.gif" border="0" class="bullet" />phpMyAdmin</a></li>

After this code block, on a new line add the following code:

<li><a href="http://localhost:8888/utilities/adminer/index.php"><img alt="" src="images/bullet.gif" border="0" class="bullet" />Adminer</a></li>

Replace the absolute URL referenced in the code with the location of your Adminer install.

You’re done! If you want a bit more Adminer flavor, pick and install one of the CSS skins. So much nicer to look at than the default style.