WordPress Visual Editor Not Expanding With Zurb Foundation 5 CSS Styles

I just hunted down a very annoying bug in my Manifest Foundation WordPress starter theme that was preventing the visual editor (TinyMCE) from expanding vertically when the default CSS styles from the Zurb Foundation framework are included as an editor stylesheet.

Basically, the height of the visual editor is supposed to be determined based on how much content you’ve actually written in that area. This prevents you from having to scroll both the editing area and the page independently from one another. As you add content the height automatically expands, keeping your editing toolbar visible at the top of the page. Overall it’s a very nice feature, albeit one that many of our clients don’t always grasp intuitively (but that’s another post).

The bug I mentioned was preventing the editor from expanding vertically. Oddly enough the height of the editor would increase by one pixel every time that the user clicked the editor, or navigated using the arrow buttons on their keyboard.

After ruling out that this was a core error or at all related to any of the plugins I was running, I was then able to disable the editor stylesheet and see that the editor functioned as intended. The offending rule is located in the /scss/foundation/components/_global.scss partial of the Zurb Foundation framework.

As part of it’s styling reset, it ensures that both the <html> and the <body> elements are set to 100% height. On the front-end of a theme this ensures that the off-canvas, mobile menu will work as intended. However, the visual editor in WordPress uses an embedded iFrame that also includes these elements. Just place the following rule at the end of your editor stylesheet and you’ll come up aces.

html, body {
	height:auto;
}

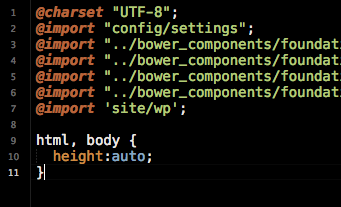
An example of my full editor-style.scss file follows:

@charset "UTF-8";
@import "config/settings";
@import "../bower_components/foundation/scss/foundation/components/type";
@import "../bower_components/foundation/scss/foundation/components/clearing";
@import "../bower_components/foundation/scss/foundation/components/tables";
@import "../bower_components/foundation/scss/foundation/components/thumbs";
@import 'site/wp';

html, body {
	height:auto;
}

Simple Filters Make Using Custom Post Types Easier

I’m always looking for good ways to make the WordPress UI as intuitive as possible for Manifest Creative clients. You’d be amazed at how many folks get frustrated trying to remember “What field does what?”. There’s naturally a bit of disconnect between filling out information in the admin and how it’s displayed on the front-end to visitors.

A great example of this disconnect between the admin and front-end is one of our non-profit clients. We use a custom post to display a list of sponsors for the organization. Each post type includes several meta fields for details and is displayed on the front-end alongside the sponsor’s logo. In this use case it makes perfect sense that WordPress’ featured image feature would be used for the sponsor’s logo. But, because “featured image” is not immediately equated with a logo, it’s a prime candidate for customization.

By simply changing the text from “Set featured image” to “Choose sponsor logo” we can eliminate any question of where the admin user should set that particular item. As they say, it’s the little things!

When I create a new custom post type, there are 3 areas that I consider mandatory to customize:

  1. The “Enter Title Here” text shown for the post headline
  2. The “Featured Image” meta box title
  3. The link that says “Add featured image” or “Remove featured image”.

All of this code usually goes into the individual PHP file I use to create the custom post type, but you could just as easily include it in your theme’s functions.php file.

<?php
/**
* Filter the default title
*
* @param string $post_title The current 'Enter title here' text
* @return string The modified default text
*/
add_filter('enter_title_here', 'post_type_default_title');
function post_type_default_title($title) {
	global $post_type;
	if ( $post_type == 'mcrm_contacts' ) {
		$title = 'Company Name';
	}
	return $title;
}

/**
* Filter the Featured Image Metabox
*/
add_action('do_meta_boxes', 'post_type_featured_image_box');
function post_type_featured_image_box()
{
    remove_meta_box( 'postimagediv', 'mcrm_contacts', 'side' );
    add_meta_box('postimagediv', __('Company Logo'), 'post_thumbnail_meta_box', 'mcrm_contacts', 'side', 'default');
}

/**
* Filter the Featured Image link
*
* @param string $content The original link for featured image
* @return string The modified string
*/
add_filter('admin_post_thumbnail_html', 'post_type_featured_image_link');
function post_type_featured_image_link( $content ) {
	global $post_type;
  if ($post_type == 'mcrm_contacts') {
    $content = str_replace(__('featured image'), __('logo'), $content);
  }
  return $content;
}
?>

Awesome tools built on WordPress

I’ll continue to update this post as I find other “best-of-breed” or useful apps that I find for working with WordPress.

Today I found two cool tools that I thought were worth mentioning…

Screenshot of the Pea.rs website
The Pears theme lets you create your own repository of design patterns.

The first is an awesome WordPress theme by the folk over at SimpleBits (yep, Dan Cedarholm is the co-founder of Dribbble). It’s called Pears and allows you to create a custom library of your own HTML and CSS snippets for future use. Run it on your localhost machine (or online) and you’ll have your own repository of design patterns you can apply to any project. One word: Suhweet!

Screenshot of the wpremote.com website
WP Remote lets you bulk-manage your WordPress sites.

The other item worth mentioning is WP Remote. It’s basically a service that lets you manage multiple WordPress installations. Upgrade the core files, plugins, etc. all from within a single control panel.

I have nearly 100 WordPress websites that I’ve developed, and needless to say, keeping them all up to date can be a pain in the hind-end. I’ve toyed with the idea of putting them all into a multi-site installation, but that seems like overkill (not to mention a lot of retrofitting). I think I’ll give this service a try and see how it works out. Oh, did I mention that it’s free?!?

WordPress plugin to fetch river conditions from USGS

I’ve authored and created another WordPress plugin! This time it’s mainly geared at fishing guides and river outfitters. You can see this plugin in action on the Tightline Adventures website and at FishTales Outfitting.

Updates

Synopsis

This is a WordPress plugin that fetched streamflow and river data from the USGS. It’s intended use is for river guides and fishing outfitters to report conditions. It may also be useful for rafting companies and others who offer services related to rivers and streams.

PLANNED FUTURE DEVELOPMENT

  • Add temperature conversion option for Celsius to Fahrenheit
  • Add plugin options page to allow easier administration
  • Addition of shortcode to report on a site number(s)
  • Use Google JS Maps API instead of Static Maps
  • Automatic removal/hide of sites not reporting any data.
  • Add Widget(s)
  • Migrate to classes (OOP) rather than collection of functions
  • Improved documentation
  • Implement some sort of caching, perhaps via the WordPress transients API

USAGE

See each function for a list of accepted parameters.

Begin by specifying the rivers you’d like to display. Identified as an array within the function.
$rivers = usgs_fetch_sites(array(‘jefferson’,’madison’,’bighole’,’beaverhead’,’ruby’));

Choose which data parameters to include (stream discharge, temperature, etc), or leave blank to include all.
$data_params = usgs_fetch_dataParameters();

Place a call to fetch the JSON from USGS
$riverData = usgs_fetch_riverData($rivers,$data_params);

Display the river data as an unordered list
usgs_display_RiverData($riverData,$showMap=false);

Show a static Google map identifying the locations
usgs_display_map($riverData,’riverDataMap’,’riverMap’,650,450,$maptype=’terrain’,$echo=true);

Notes

Sorry for the poor documentation. For now it will have to do. I’ll improve it later!

Script to make WordPress site migrations easier

I’ve cleaned up and release the script that I use to migrate my WordPress sites between my local development server and a live web server. It’s hosted up on GitHub if you care to grab a copy or fork it to make your own improvements.

Updates
  • 01/26/2012 – Script now searches thru all custom fields (postmeta table) and replaces any hard-coded URI’s

There have been several attempts by others (many of which are more elegant) in the past to address this problem, but it always seemed like overkill to me. Many of them required a plugin or hacks to the wp-config.php file.

This is my attempt to simplify my own process a bit. If you use the script, I’d love some feedback on how it worked for you.

WordPress Migration

The purpose of this script is to quickly and easily allow the user to update all database references for a WordPress website. Instead of doing a manual, find-and-replace of a MySQL text file, this script connects to your WordPress database and does all of the heavy lifting for you.

WARNING! This script modifies the database as configured in your wp-config.php file. You should make a full backup of your database before using this script.

SECURITY NOTICE – This script should not be left on a live web server as it offers direct access to your database. When you’re done with your migration, delete the script.

Script Installation

  1. Ensure your wp-config.php file has the correct database connection settings.
  2. Upload the wp-migrate.php file into the root directory of your WordPress installation.
  3. Point your web browser to the script (like http://mywebsitedomain.com/wp-migrate.php)
  4. If your wp-config.php file is setup correctly, the script will determine the current “old” website URL.
  5. Set the “New URL” field to the absolute URL you’d like the database updated to.

Additional Notes

  • Depending on the plugins you use, you may get PHP error notices about files not being included. You can generally ignore these.

Replacing a post title with an image in WordPress

From time to time I answer questions on a variety of WordPress forums and discussion boards. I was asked an interesting question about WordPress today. One that seemed fairly simple. As I wrote my reply, I realized that there are several different ways to skin a cat.

I’m using WordPress. I want to replace the post title of my About Us page with a logo. How should I do this?

There are a few different ways to approach this.

1) You could duplicate the page.php file and call it page-about.php (or whatever the slug is for your “About” page.) Find the area that controls the page title and replace it with your logo. This will ensure that this PHP file is used only when the about page loads. The WordPress Codex will tell you all you need to know about the template hierarchy.

2) You could modify the page.php file and add an if/else statement.

<?php
if ( is_page('my-page-slug') ) {
  echo '<img src="'.get_bloginfo('template_url').'/path/to/img.png">';
} else {
  get_the_title(); //Or similar code from the template
}
?>

3) There’s a third way you could approach this using only CSS. It’s also a bit more SEO friendly than just using an image. Presuming that there’s a class that’s specific to the page, you could target just that page. For the purpose of discussion we’ll pretend that the body tag has a class of ‘.about’. You could do something like this:

<style type="text/css">
body.about h1 { /*Let's presume your banner title is an h1 element */
  width: 150px; /* Set this to the width of your image */
  height: 75px; /* Set this to the height of your image */
  background: transparent url('my-image.png') no-repeat top left; /* Change the URL to point to your image */
  text-indent: -9999em; /* This ensures that the text itself will not show. */
}
</style>

<html>
  <body class="about">
  <!-- The title below will be text and shown to search engines.
  Normal visitors will see the image you've specified in the CSS -->
  <h1><?php the_title(); ?></h1>
  </body>
</html>

Creating navigation for WordPress custom post types based on taxonomy

Custom post types in WordPress have really elevated the software from being primarily a blogging platform and into a full-fledged content management system. WordPress has several built-in functions that let you list pages and categories so that users can navigate your site, but for custom post types sometimes you have to dig a bit deeper than wp_list_pages() or wp_list_categories().

I’ve developed a nifty little function that helps you to output a list of the custom taxonomies attached to any post currently being viewed. Continue reading Creating navigation for WordPress custom post types based on taxonomy

I’m going to start rating my most used WordPress plugins.

I’ve noticed that many plugins  in the WordPress plugin repository just don’t get rated. I suspect that it’s because once someone installs the plugin they tend to “set it and forget it”. I’m going to make a conscious effort to rate my most used plugins. You should too.